
Here I have discuss some more yogic exercises which are useful to cure inflammation of joints, diabetes & obesity.
Santulan Asana
Put a carpet or blanket or mat on the floor. Stand up on the carpeted floor. Make the body straight and firm. Look straight forward. Let the hands hang on the sides. This is the position of readiness.
Note: For doing this asana you have to stand on one leg at a time. It is not easy for everyone to stand on one leg on the floor. Therefore, those who might have any difficulty in standing on one leg on the floor, should stand near a pillar or a wall for supporting the body weight.
Steps for Practice

Stand up on the right leg and fold the left leg at the knee. Bring the heel of the left leg near the hip. If the heel cannot be brought nearer the hip due to pain in the knee, fold the leg backward as much as possible.
Catch the toes of the left leg with the left hand in such a way that both the toes are held with the palm. Bring heel of the folded leg to the hip or nearer to it.
Tighten the right hand. Keep all the fingers together and slowly raise the right hand up towards the sky. Do not rush in lifting the hand. Keep the palm facing downwards while raising the hand. When the hand is fully raised the palm should remain in the straight forward position.
Stay in that position for six to eight seconds. Keep the lifted hand tight and firm. The right leg on which you are standing should be tight and straight. Keep looking straight. There is no special breathing requirement in this asana. Keep breathing normally, while doing this asana.
After staying in this position for six to eight seconds, return to the position of readiness with the following process. Slowly bring the lifted hand down, keeping it in a tight condition. Do not drop the hand. When the raised hand has reached the side, release the left leg to come on the floor. You are now in the position of readiness again after completing one round of Santulan Asana.
After resting for six seconds stand on the left leg and fold the right leg and raise the left hand in the same way as you did the first time. Make further rounds alternately by following the same process.
Daily Practice
Do it only four times daily during the first week. After practising for a week, increase to six times a day.
Benefits
Santulan Asana is mainly a kriya of the major joints of the body. It removes rigidity and brings flexibility to them. It also normalizes the blood circulation in the affected areas and tones up the muscles. As a result of enhanced blood circulation, flexibility and muscular conditioning, pain in the joints is corrected.
This asana has curative effect upon the knees, ankles, shoulder joints, wrists, palms and fingers. It is an easy asana and any person can practise it either standing on the floor or with the help of the wall. For the general practitioners it is a good asana for their body activation and flexibility of the joints.
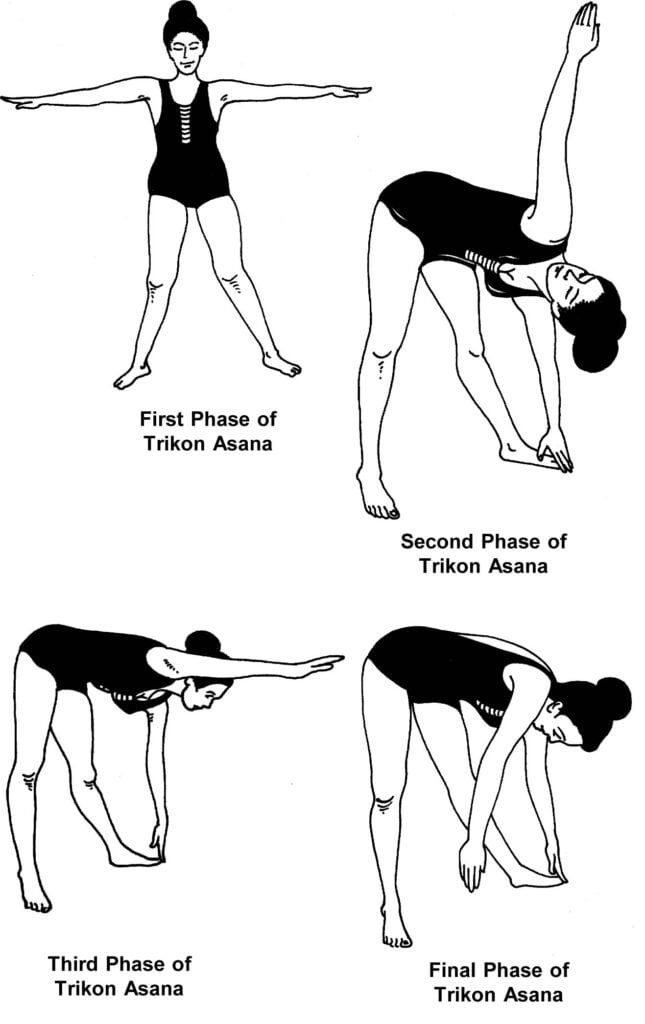
Trikonasana
Stand up on the floor. Keep the legs at about two and a half feet distance from one another. Look in front. Let the hands hang loosely on the sides. Make the legs firm and tight.
Steps for Practice
- Inhale slowly and at the same time raise both the hands up to the level of the shoulders on their respective sides. Keep the hands tight while raising up. This will bring both the hands in one line. The palms should be facing downwards. By the time hands have come up in one line, inhaling should be completed. Stay there for two seconds.
- Then start exhaling and simultaneously lower the left hand to touch the left foot and raise the right hand up towards the sky. By the time you have touched the foot you shall complete exhaling. When exhaling is over hold the breath. While going down bend forward, not side ways. Keep looking at the toes you are going to touch. Try to touch the toes of the left foot. After touching the toes, turn your head right and raise it towards the sky. Now try to see the palm of the right hand. Keep looking at the right palm for about two seconds. Do not bend your legs at the knees. Keep the legs quite tight.
- After looking at the right palm for a few seconds bring the upper hand tightly in front and then look at the floor beneath that palm during this stage. Your left hand remains on the toes of the left foot and your right hand is fully stretched out in front of you. Your body is bent right in front. Legs are quite tight. The right arm is closer to the right temple. You are still holding the breath and your posture is as shown in fig.
- Then move the right hand about forty-five degrees to the right side while keeping the arm and the hand quite stretched. At this stage the fingers of the right hand are together and the palm about one foot above the ground. Look at the ground where the fingers of the right hand are pointing as shown in fig. Stay in this position for two seconds. Keep holding the breath
Now bring the right hand on the right leg and start inhaling and standing up, your hands are dragged lightly on the legs till you are back in the standing position. After returning to the position of readiness your hands are again on the sides. You have completed one round of Trikonasana. Now rest for two normal breaths.
After resting for about five seconds repeat the asana by following the same process. In the second round you have to touch the right foot and raise the left hand towards the sky. Make further rounds alternately.
Daily Practise
Make four alternate rounds daily during the first week. During the second week and afterwards make six rounds daily. Never make more than eight rounds in a single day.
Benefits
Trikonasana has medicinal value for curing the pain or any disorder of the neck and the shoulder joints. People suffering from stiffness in the neck will find this asana very effective in correcting that disorder.
This asana has good effect upon the spine, the hip joints, the hands and the palms. All the major joints above the waist area are properly activated and their muscles are duly toned up by this asana. The arthritis are advised to practice Santulan Asana first and then the Trikonasana. By doing them one after the other all the major and minor joints of the body are fully activated and their functioning is normalized.
For the general practitioners, Trikonasana has several benefits. It develops the visionary power of the eyes; brings flexibility to the spine; and provides the quality of mental attentiveness. It is easy asana and hence recommended to all practitioners of yoga.
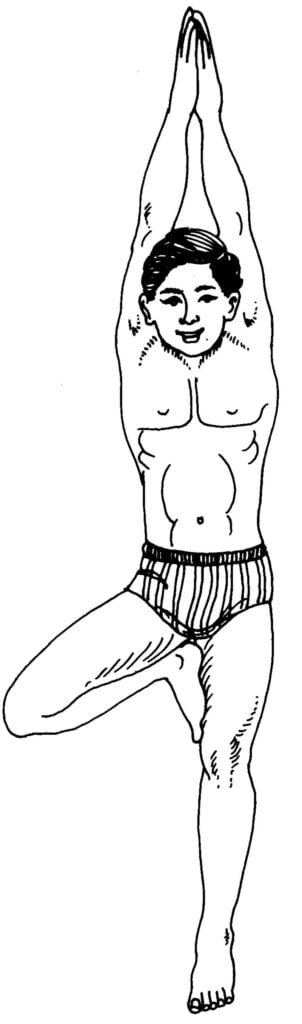
Vrikshasana
Stand up on the floor. Look in front at the level of your eyes. Keep the hands hanging loose on the sides. Make the body straight and firm. Breathe normally. This is the position of readiness.
Steps for practice
You have to stand up on one leg for practising this asana. In case you have difficulty in standing on one leg, take the support of a wall or a pillar. Then do the following steps:
Stand up on the left leg and fold back the right leg at the knee. Bring the right foot on the thigh of the left leg so that the outer part of the heel and sole rest on the left leg. This will twist the right foot a little and press its side against the left thigh. Do not press the thigh with the heel itself but with its side. When the side of the heel has been firmly pressed against the left thigh, make the left leg and the whole body tight and straight.
Then raise both hands side ways towards the head. When the hands are stretched above the head, join the palms and the fingers together. Then bring the palms on the head so that the wrists rest on the head.
When the palms have been jointly put on the head, you have to do several things at this stage. Try to give a backward pull on the folded elbows in order to bring them in one line. But do not exert too much. Look straight forward at the level of your eyes. Tighten the leg you are standing on. Now there is tightness all over the body. You are breathing normally, stay in that position for six to eight seconds. You are in Vriksha Asana, as shown in fig.
After holding in that asana for the desired period, loosen the pressure on the palms and stretch out the arms in order to bring them back tightly to their respective sides. When the hands are in position, grab the toes of the folded leg. Lift it slightly upwards and then drop it on the floor. You are now back in the position of readiness. Rest for two normal breaths.
After resting for a few seconds, repeat the asana a few more times alternating with leg position. For example, in the second round you have to stand up on the right leg and fold the left leg. Then follow the various steps done in the first round for completing this asana.
Daily Practice
Make four rounds daily during the first week. During the second week and afterwards make six rounds daily. Keep alternating the leg while making further rounds. Do not practise it more than six rounds in a single day.
Benefits
Vriksh Asana activates all the joints of the body. All the major joints of the body are affected by this single asana. It tones up the muscles of the ankles, toes, knees, hip joints, shoulder joints, elbows, hands and fingers. As a result of this activation and conditioning of the joint muscles, blood circulation becomes normal in the joints and they regain strength.
For the general practitioners Vriksh Asana has good conditioning and strengthening effect upon their bodily joints and bones. It brings flexibility in the legs and hands and enhances the measurement of the chest. It is an easy asana and hence every practitioner of Yoga can do it.
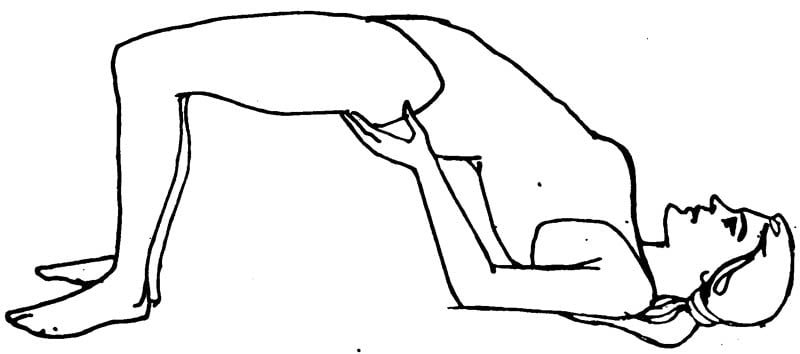
Setubandhasana
Lie down on your back on the floor. Fold the legs at the knees and bring the heels near the hip. Keep the heels at about two to three inches apart from one another. Let the knees also be apart from one another by about three inches. Bring your hands closer to the body on both sides. Put the palms on the floor. Look straight up. Breathe normally. This is a position of readiness.
Steps for Practice
Lift the hip and the waist upwards while keeping the shoulders and the feet on the floor. When the hip has been raised upwards. Support in with the palms on both sides.
Gradually keep rising the hip upwards while pushing the palms towards the waist area. Let the hands help in raising the waist upwards as high as it can be raised without strain. Now support the body weight on the thumbs and the index fingers and the palms on sides. Let the shoulders, neck and the head be firmly on the floor. Try to check that the thighs are parallel to one another with a gap of about three inches. Keep breathing normally. Stay in this position for six to eight seconds, as shown in fig.
After remaining in the raised up position of six to eight seconds, start lowering the hip towards the floor while still supporting the body weight on the palms, but do not let the body drop on the floor. Bring it down slowly. When the hip, the waist and the back are on the floor put your palms on the floor on both sides of the body. Stretch out the legs on the floor and rest for two to three normal breaths.
After resting for a few seconds repeat the asana by following the same process as you did during the first round.
Daily Practice
Make four rounds daily during the first week. During the second week and afterwards make a maximum of six rounds. Do not ever make more than six rounds in a day.
Benefits
The main impact of Setubandha Asana is on the spine and the hip joints. Those who have pain either in any part of the spine or in the hip joints are strongly advised to practise this asana. This asana also cures pain and corrects disorders of the shoulder joints, neck, arms and the palms. Since it is an easy asana, arthritis in any condition and of any age can practise it.
For the general practitioners, it is a good asana for creating flexibility in the spine, for removing wind and gastric troubles and for correcting respiratory disorders.
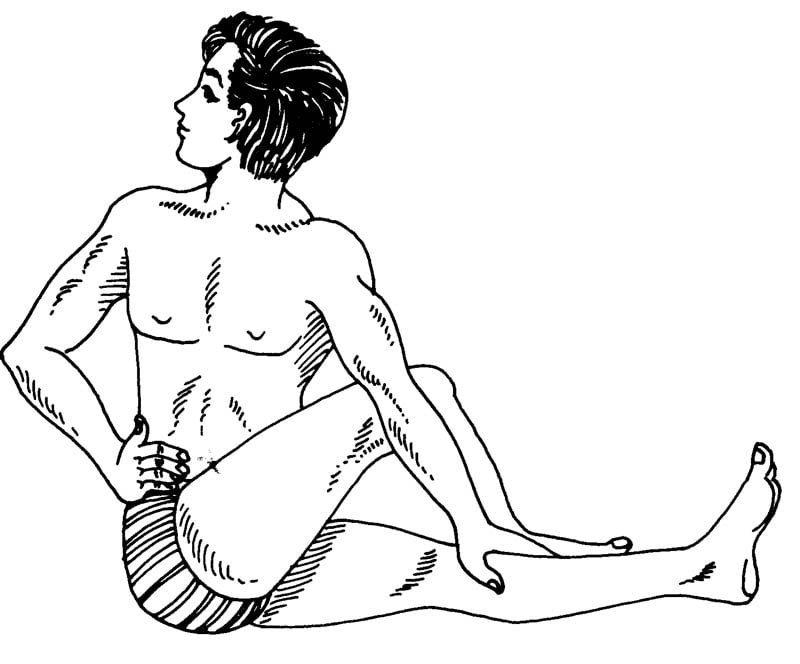
Siddhasana
Persons with moderate joint pain of any type can be completely cured if they practise the asanas of the series already described above. The chronic cases, however, might take a little longer time for getting fully cured. Therefore, the arthritis patients with chronic trouble are advised to keep practising all the asanas of this series regularly. By continuing the practice they should be fully cured in two to three months.
It needs to be emphasized that one must take a proper diet along with the regular practice of yoga in order to get a satisfactory result. It is expected that the arthritis take their meals according to recommendations. I wish only to remind them not to take curd (dahi), bananas and to avoid taking tea and cigarettes on empty stomach.
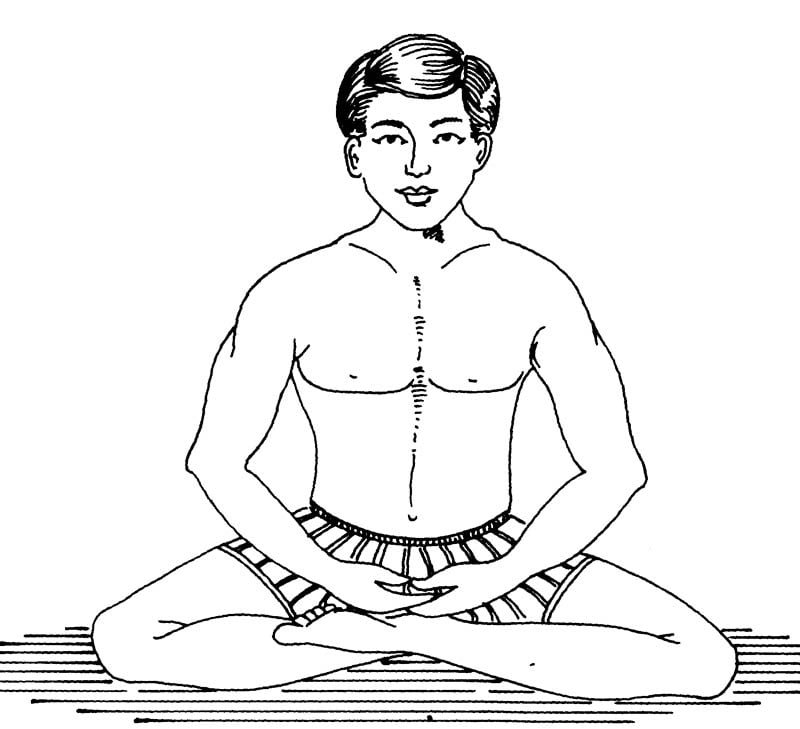
Be seated on the carpeted floor. Stretch out both the legs in front. Keep your spine straight up and firm. Look in front keep the hands down on the floor. Breathe normally. This is the position of readiness.
Steps for Practice
Fold the left leg back from the knee and bring the foot in front. Then stretch the toes and ankle of the left leg and try to bring them in a straight line. In case you find it difficult to bring them in a straight lines, stretch them only as much as possible. Bring the heel near the testicles without pressing against them. Now your left knee should be on the floor. In case the knee cannot touch the floor, let it remain a little up and raised.
Now fold the right leg at the knee and bring the right foot on the top of the left foot. Keep the right heel just above the left heel. Then stretch the ankle of the right leg while keeping the right knee also on the floor. Keep the legs in the same condition. Do not put any pressure on the testicles.
Stretch out both the hands. Make a circular shape with your thumb and the index finger in each hand. Then stretch out the remaining three fingers of each hand and keep them firmly together. Now put the right wrist on the right knee and the left wrist on the left knee. Make the arms and the hands tight. Keep the spine straight and firm. Fingers pointing downwards. Breathe normally.
Stay in this position for about one minute. After remaining in the same position for about one minute, loosen the fingers of both the hands. Then lift up the right leg by hand and put it down on the floor and stretch out the legs. After resting for a few seconds repeat once more by alternating the legs. This time your right foot will be underneath and the left foot will be on the top. Stay in this asana again for about a minute.
Daily Practice
Practise Siddha Asana for a maximum of three minutes only. Begin with about two minutes and gradually increase the time to three minutes daily. During this period you will be doing Siddha Asana only twice and the total time spent will be three minutes only. Do not practise it for more than three minutes in a single day.
Benefits
Siddha Asana has a curative effect on all the joints below the waist area. The hip joint, the knees and the ankles are very effectively activated doing this asana and, as a result, the circulation of blood in these areas becomes normalised, the supply of synovial fluid (joint fluid) is restored, and the pains are removed.
Siddha Asana has a good effect on the nervous system all over the body. People suffering from any kind of nerve defects will find this asana very beneficial. It is regarded as a vitally important asana for gaining the power of concentration and for acquiring mental equilibrium. Though it might appear a little difficult asana for the beginners, but with regular practice, any person can do it properly.
Natrajasana
Stand up on the floor. Let the hands hang loosley on the sides. Make the body firm and straight. Look in front. Breathe normally. This is the position of readiness.
Steps for Practice
Stand up on the left leg. Fold back the right leg at the knee. Grab the toe of the right leg with the palm of the right hand. At this stage your right leg is just folded backwards and it is held by the palm. Keep the leg in the same position.
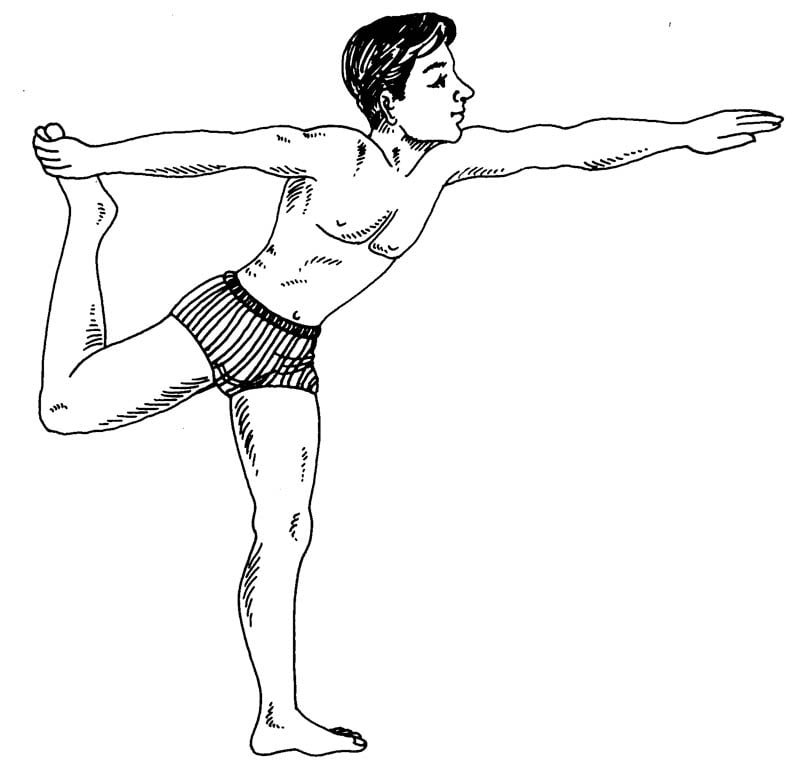
Then bring all the fingers of the left hand together and tighten the left hand. When the left hand has been tightened, slowly raise this hand up and at the same time slowly push the right leg backwards. In this process you are doing two things simultaneously. You are raising the left hand in front pushing the right foot backwards. While doing this, you should give a maximum backwards push with the right leg. But do not raise the left hand straight up towards the sky, keep it slanting, pointed towards the horizon, so that the whole hand is visible to you.
Now bend the body above the waist slightly forward and try to see the top of the finger of the left hand and keep looking there. Keep the right foot fully pushed back and tight. Make the left leg quite firm and tight. Do not loosen the left leg when you bend the body slightly forward. Stay in this position for about eight seconds, as shown in fig. Keep breathing normally, all through this asana. In case you have difficulty in doing this asana on the floor, stand with the support of either a wall or a pillar. After you have become used to practising it, do it standing on the floor, without any support.
After remaining in this position for about eight seconds, gradually bring the left hand tightly down and bring the right leg back to the folded position and then release it. You are now standing on both legs. Rest in that position for a while. After resting for a few seconds, repeat the asana. This time stand up on the right leg, hold the left leg and raise the right hand. You have to do it alternately by following the same process as done in the first round.
Daily Practice
Make four rounds daily during the first week. During the second week and afterwards make six rounds daily. Practise it alternately. Do not make more than six rounds of Natraj Asana in a single day.
Benefits
Natraj Asana activates all the major and minor joints of the body in a single process. For the arthritis it has a great curative effect upon all the joints. It brings proper activation upon the shoulder joints, hip joints, the knees, the ankles, the palms and the fingers. Because of this conditioning, the muscles, nerves and tissues of these areas get normalized and their functioning is restored.
Natraj Asana has also a good effect upon the spine. It removes spinal rigidity and pain. It removes backache, stiffness and other disorders of the spine.
To the general practitioners it provides flexibility to the limbs. Strengthens the major bones, enhances the digestive power, improves eyesight, and generates vitality, potency and the quality of determination. A significant aspect of Natraj Asana is that it symbolizes action. In other words, it breaks the condition of standstillness in the individual and creates a feeling to act. Because of these benefits, it is a highly recommended asana for the arthritis as well as for the general practitioners of yogas.
Ardhavakrasana
Sit down on the floor. Stretch both legs in front. Make the legs parallel to one another. Put both palms on the floor. Breathe normally. Keep the back straight while sitting.
Steps for Practice
Let one leg remain stretched on the floor. Fold the other leg at the knee and pull it slightly backward.
Put the heel of the folded leg at the central point between the knee and the ankle of the stretched leg. Then drop the heel on the outer side of the leg. Keep the heel quite close to the stretched leg. Now the knee of your folded leg should be upward.
Lift the hand which is on the side of the stretched leg; bring it up and parallel to the stretched leg. Grab the stretched leg near the heel of the folded leg. Now you have made a lock with the arm and the knee. If you cannot grab the stretched leg, just touch it or keep the fingers near the central point.
Lift the other side hand and put its palm on the waist, keeping the thumb and the index finger side upward. Now your elbow is folded and making a 90O angle with the stretched leg. At this stage see that your head, neck and back are straight upward.
Start exhaling slowly and at the same time begin twisting and turning the waist, chest, neck and the head area in the direction of the folded elbow. Twist and turn as much as you comfortably can. In this turn, your folded elbow travel 180O. For example, if you were sitting facing east and you have to turn right then your face will turn first to south and then to the west while your stretched leg will remain facing east.
After making the maximum turn, hold the breath and stay in that position for six to eight seconds. At this stage, your spine should be straight upwards and you should be projecting the vision at a maximum distance (as shown in Fig.)
Then start inhaling slowly and return to the position of readiness.
Now break the lock, stretch out the legs, relax the body, put the palms on the floor and rest for six seconds.
After rest repeat the asana with the other leg, following the same method.
Daily Practice
Make four to six rounds alternately. Never do it more than six time (three times with each side).
Benefits
The main effect of this asana is on the waist and abdominal areas. It activates all the organs and glands of these parts of the body. This asana has a very good effect on the pancreas, adrenal, grand, ovary in female and the testicles in male.
It has several other good benefits. It corrects constipation, stomach troubles, piles, backache, stiffness in the neck and spinal disorders. It is easy to do and therefore recommended to every practitioner of yoga.
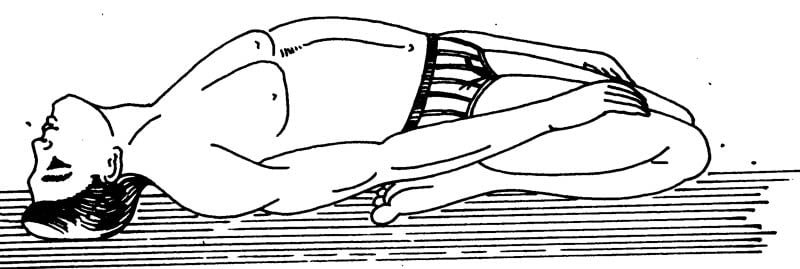
Suptavajrasana
Sit on the floor with your legs folded under you. (See Fig.) Put the palms on the floor on both sides of the body and straighten your spine. Now look in front and breathe normally.
Note: This asana is a little difficult. Those whose body condition is not very flexible are advised to practise this asana in a gradual way without trying to do the complete asana all at once. It can be done without any strain in stages and soon one can perform it with easiness.
Steps for Practice
Kneel on the floor, keeping the body weight on both the knees. Put the palms on the floor on both sides of the folded knees to support part of the body weight. Keep the knees about four inches apart from one another. Let the ankles and toes of both the legs fall on the floor in such a way that the toes are brought close together but the heels are spread out. This will make a broad “V” curve with the toes, soles and the heels.
Now gradually and cautiously start lowering the hip and let it rest on the curve of the soles. Control the body weight by keeping both hands on the floor while lowering the hip. If you do not feel strained, put the whole body weight on the curve of the feet as shown in Fig. In case of difficulty in sitting in this position, further stages should not be tried till the body is prepared for it. Those who can sit comfortably on the toes and soles should proceed to the third stage.
Lift the right hand and place it on the floor behind the hips. Then move the left hand also behind the hip and bend a little backward.
Now put the right elbow on the floor by bending backward. Then put the left elbow on the floor. By moving the elbows towards the hip gradually let the head touch the floor. When the head has come down on the ground, gradually put the shoulder and then the whole back of your body on the floor. Do not rush. Go slow in this process.
Now you stretch both the arms and hands on both sides of the body. Keep the palms on the floor and close to the body, as shown in Fig.
Then do a few deep breathing exercises by just inhaling and exhaling the air through both nostrils. Stay in that position for six to eight seconds or less. You are in Supta Vajrasana. q Now you have to return with the following method: Grab the ankles with the hands and put the elbows on the floor. Now pull the ankles and by putting the weight of the body on the elbows lift the head and back and return to the sitting position. q Then unwind the folded knee and be seated in the position of readiness for rest. q Rest for six to eight seconds and then repeat the asana with the same process.
Daily Practice: Do it three to four times. Never do it more than five times.
Benefits: This asana has some specific benefits for the people suffering from diabetes. Since this asana activates all the cells of pancreas and increases its blood supply, it begins to function in a normal way. This asana has several other benefits. It corrects the disorders of the stomach, intestine, liver, kidneys, spleen and the organs of the abdominal area by activating and energizing them.
It has medicinal value for people suffering from indigestion, wind trouble, constipation and piles. Then disorders of the spine and joints are effectively corrected by this asana. It has also good effect on sex glands. It enhances sexual potency.